Wood Slat Wall
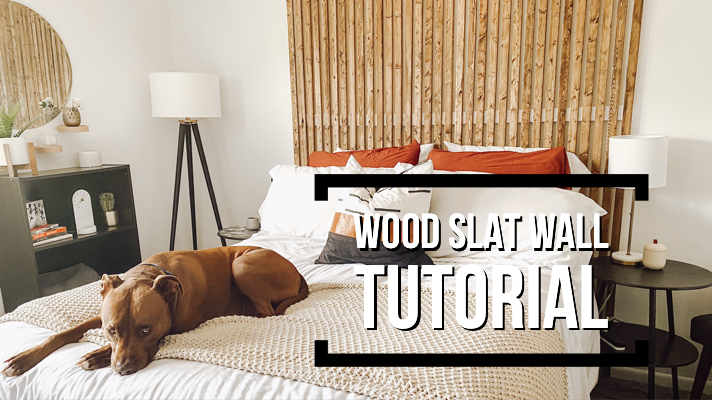
Well once you get that itch to make some decor changes, it doesn't just end! Last weekend I got my painted accent wall done & this weekend decided to tackle a wood slat wall in the guestroom!
I had looked at multiple types that I like & really went back and forth between painting the wall black or keeping it white. I decided on it staying white, 1. because it would keep that room light and bright and 2. It was easier! Haha. All along I knew I wanted wood boards- not all painted- which also looks pretty cool! So lots of choices for how you want to make it look!
I looked up multiple tutorials on Pinterest with all different methods & ended up basing what I did off of this blog post from Campbell House, with a few differences.
What you need:
- 3 Pieces of 4x1 primed MDF , 70 inches long (just longer than the queen sized bed)- I used 1 MDF and 2 regular boards painted white because it's what we had at home!
- 1x2s- we used 33- The blog I followed used select pine but I did not want to pay $6.50/board so went with just regular old common 1x2s- which needed some work so just more time.
- Stain- I used Early American (and rags for stain)
- Sander
- Nail gun
- Level
- Tape Measure
- Stud finder
- Screws
I think that is everything I used 🤔
Step 1- The Anchor Boards- I started with measuring the bed and how far out I wanted the slats to go. I decided on 70 inches. Cut the MDF boards to that length. Save a piece...This is what I used as a spacer! Measure out the center of the room and match with the center of the boards. Use screws to attach the boards. Touch up any paint you might need to, including covering the screws because some might be visible.
Step 2- Prepping the slats- So remember I used cheap wood! This meant lots of sanding- like LOTS! haha I sanded all the boards to get them as smooth as possible. (I did do some shifts of staining & putting boards up early so I could make sure I liked it - all just sanding would have been awful!). If you have no concern about spending more- splurge on nicer wood! 😜
Step 3- Staining- Time to stain the color you chose! Don't forget to wipe off after- I did that once and it stayed pretty sticky! 🤦♀️
Step 4- Putting the boards up! I started at the end and overlapped my anchor pieces a bit. Using the left over piece of MDF as a spacer, put it up agains the anchor piece and squeeze the 2 pieces together, putting a nail through your slat into the anchor board. Do this at all 3 anchor spots. Then just keep going and going and going! We had an outlet that we needed to work around, super easy though! Just used a small MDF piece above and below the outlet and cut the board so that the outlet was open
Really, that's it! It was definitely time consuming- but got it all done in a day. Keith did help me with some of it, if not I think it would have been a 2 day project for me...mostly because of all the sanding! I am super happy with the final project! What do you think?!
If you try this out at all I would love to see how it turns out!


Check out a little video of work being done! It's really the only thing I had to show how I did the spacing of the slats! Enjoy 😀